- HOME
- iPhone Generations
- iOS
- iOS 8 Best Features
- Siri
- iOS Music
- iPhone News
- iPhone Specs
- iPhone SMS
- iPhone Applications
- iPhone Video
- AirPlay
- iPhone TV
- iPhone Network
- iPhone GPS
- iPhone Ringtones
- iPhone Tips
- iPhone Sys Tricks
- iPhone Emulators
- iPhone Hacks
- iPhone Customization
- iPhone Accessories
- Cheap Calls
- Buy iPhone
- Arabic iPhone
- Hot Topics
- Privacy Policy
- Site Search

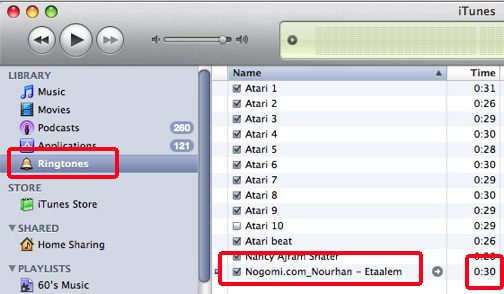
Make free iPhone ringtones using iTunesCreating free iPhone ringtones using iTunes is the most desirable way of creating ringtones for both Mac and PC users specially if iTunes is your central music player. It would have been very nice if it was simple to make free iPhone ringtones by right click on any song in your iTunes library and then choose to convert it to ringtone. Unfortunately, it is not that simple to create a ringtone from songs not purchased from the iTunes store.
The official supported way is to purchase the song for $0.99 and then convert it to ringtone by paying another $0.99. This is due to the different end user agreement for a song and a ringtone. Record companies look at ringtones as another use of the song, other than just listening to it, and therefore, you have to pay for that use. Even if you have the song on an original CD that you purchased, you can’t make free iPhone ringtones from it using iTunes the easy way. This of course doesn't make sense at first glance. Apple and the record companies are very strict about making free iPhone ringtones specially with the iPhone being an iPod that plays music, and with iTunes being a song transferring medium. The reason is that those songs are not DRM (Digital Rights Management) protected.
DRM Protected SongsThose songs purchased from the iTunes store are DRM protected. DRM means Digital Rights Management. It is a method of protecting digital media from being copied and played on different devices. The DRM songs purchased from the iTunes store can only be played on iPods or Apple products. This same theory applies to other MP3 players such as Microsoft Zune, Sony players, and Android phones. Each company has its own DRM protection that prevents the song from playing on other companies' devices. The best world is when songs are non-DRM protected and can be played anywhere you like on any device. Those are the ones you get from different sources on the internet, ripped from CD's or you create yourself, and most probably are the ones you have in your iTunes library.
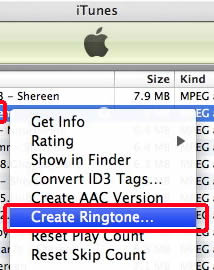
iTunes program doesn't recognize them because they are not purchased from the iTunes store and they are not DRM protected. If you right click on a song and select Create Ringtone for a non-DRM song you will get a message from iTunes telling you that you can only create ringtones from songs purchased from iTunes Store.
The copyrights law is very strict about ringtones, and Apple doesn't want to get involved in piracy issues. Therefore, there is no easy way built in iTunes to make free iPhone ringtones from non-DRM songs since the source of those songs is unknown and uncontrolled by Apple. iTunes doesn't know whether the song is from the internet, or it is from a CD or somewhere else. Only songs that are purchased through iTunes are identified and supported by iTunes to make ringtones for the iPhone and iPhone 4.
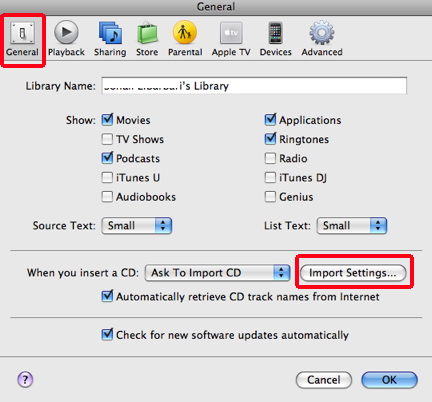
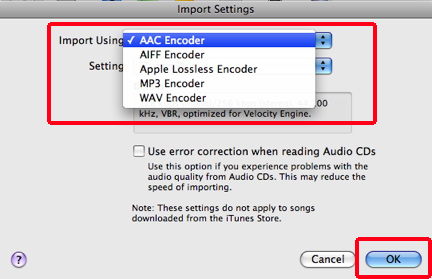
Make free iPhone ringtones the long way:The process of making free ringtones from non-DRM songs using iTunes is simple, but it involves some work. The iPhone ringtone format is m4r. Fortunately hackers found that the AAC format in iTunes is really m4r. Therefore, if you can convert your song to AAC and change the file extension from.m4a (AAC) to .m4r then you are basically done. Therefore, you need to trim or cut a 30 second of the song, which is the maximum allowed for a ringtone, and then convert the trimmed song to AAC which is really the iPhone ringtone format once you rename the extension to m4r. You have to enable AAC conversion in iTunes which is done in preferences under the general tab and clicking on import settings. Select import using AAC encoder. Once that is done, then you can right click on any song in your library and create AAC version. Now it is a simple drag and drop of the m4r file to iTunes, or simply double click on the file to open with iTunes. iTunes will place the file in the correct ringtone directory location. When you connect your PC to iPhone to sync, the ringtone will become available in the iPhone custom ringtones in sound settings. So here is the details of the process of making free iPhone ringtones using iTunes 8.2 and above: 1- Go to iTunes preferences and Import settings. This option has been changing locations. In iTunes 8.2 and above, it is in General, and a button at the bottom called Import Setting. Make sure it is set to AAC Encoder and click OK. This is only done once.
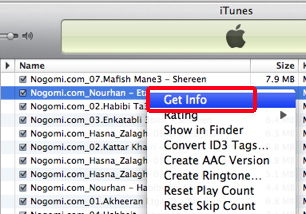
2- Right click the song you want to convert and select get info,
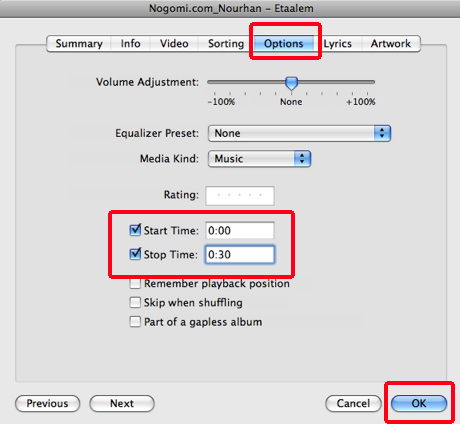
and then select Options
3- Select your starting point and ending point. Maximum of 30 seconds. 4- Click OK
8- Copy the file to your desktop or any where else you
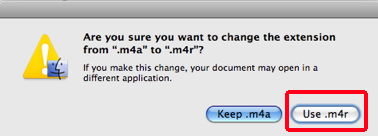
like. 9- Rename the extension of the new copy from m4a to m4r. Don't change the original file in iTunes. Only change the new copy. Click once on the new file in the Finder, and you should be able to change the extension.
Once the file name is changed you will get a message from Finder asking you to confirm. Just click on Use .m4r
10- In iTunes delete the AAC file. This is the most important step. If you don't delete the AAC file this won't work.
11- Go to the desktop where the new renamed file is located, and double click it.
12- The new m4r file will open in iTunes and it will show up under the Ringtones directory. You can have many free iPhone ringtones this way.
13- Now, Sync your iPhone and the new free ringtone will be transferred from PC to your iPhone. This ringtone can be accessed from your iPhone under Sounds, or by selecting any contact and setting the ringtone for that contact. Visit the iPhone Ring tones page to see how you can access your ringtones on your iPhone. This procedure seems long, but once you do it once, you will find that it is very simple as some steps are done only once. The beauty with this method is that your ringtone stays in iTunes, and it is always backed up whenever you backup your iPhone. If for any reason you have to restore your iPhone or iPhone 4 or update the iOS, the ring tone will be copied back to your iPhone when you restore and of course this method is completely free. Other options of creating iPhone ringtones is by jailbreaking and installing ringtones from Cydia. Another option is to make ringtones for iPhone using software installed on your Mac or PC, or you can mare free iPhone ringtones using the web. Return From Make Free iPhone Ringtones To iPhone Ringtones Return To Home Of iPhone Tips And Advice
blog comments powered by Disqus
|
 Therefore, you can't easily convert those non-DRM
songs to iPhone ringtones just because they are unidentified to Apple.
Therefore, you can't easily convert those non-DRM
songs to iPhone ringtones just because they are unidentified to Apple.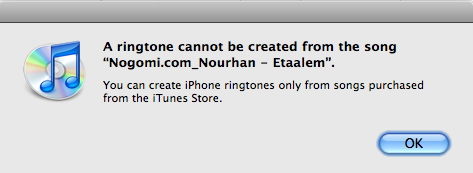
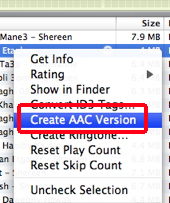 5- Right click the song one more time, and select Create
AAC Version. A new file that is 30 second in length will be created in your iTunes library.
5- Right click the song one more time, and select Create
AAC Version. A new file that is 30 second in length will be created in your iTunes library. 
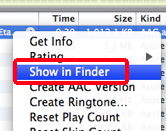 7- Right click on the new AAC file and select Show in
Finder (or windows explorer)
7- Right click on the new AAC file and select Show in
Finder (or windows explorer)

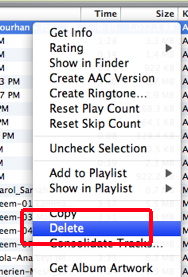 Right click on the AAC file and then select delete and then remove. The AAC file will be removed from the iTunes library.